1 All the crap in back of my garage, tarped against the elements. Sand blast cabinet on the left, a shop vac in the middle (hidden) and welders on the right. |
 2 All the crap now in the back yard. |
 3 and the area cleaned out. |
 4 A solid new base, bolted to the concrete and the skeletons of the walls. Burned out a hammer drill in the middle of the second hole, bought a nice (expensive) Bosche and drilled the final dozen holes in seconds. |
 5 The side walls up, and bolted to the garage. The plywood is glued to the studs with industrial construction adhesive, and nailed with treated spiral nails. These are SOLID. Initially, these walls were a full 8 feet high, but once up, it was obvious this was too high (not enough slope to the roof), so they were cut back to just over 7 feet. |
 6 The front wall up. |
 7 The complex shape of the roof rafters being cut. Thank you, AutoCAD. |
 8 The rafters up. 3" wood screws were used to fasten the rafters to the plates. The upper plate of the shed is lag screwed to the upper plate of the garage. The lower plate is a pair of 2x4s, laminated together and lag screwed to the wall structure. There is NO movement of this shed, at all. |
 9 And the roof sheeted; again, screws were used. It was NO fun getting that 4' x 8' sheet of 1/2" plywood up there single handed. |
 10 Close up of the roof rafters; nice fit. |
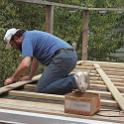
 11 Savannagh showed up just in time to take some pics. I'm clearly not a roofer! The roof strategy will have to be a bit tricky as there's no overhang on the garage roof. The plate bolted to the garage (that the rafters sit on) is seriously caulked. Then there's another layer of caulk (visible here as the white line) between the plywood and the garage wall). |
 12 The last row of shingles are glued in place with roofing tar, so there's no surface nail holes to leak. Not obvious here because of the light is the last line of defense, the roofing tar. A thick bead was run all the way along and the shingles shoved into the bead. Then another thick thick bead was run on top of all of that. I'm happy with the seal. |
 13 First door done. The doors are 2x4s on the flat, sheeted with 1/2" plywood. I like the surface mount strap hinges because they're strong and cheap, although there is a downside when it comes time to finish. |
 14 And the second door done. |
 15 I used 1x6 utility grade lumber to finish. There's a problem if a person just butts the square edges together; water can leak in the crack between the two. I decided to bevel all the edges by running them through my table saw and then orient them accordingly. They actually get 3/4" narrower as a result but there's no chance of any water leaking in. |
 16 To help "persuade" the wood to not warp (any more than it's already warped), industrial adhesive is used. |
 17 The first door "finished". |
 18 Here's the problem with flush mount hinges. There's a fair bit of morticing of the trim required as well as large relief areas on the bottom side of the various pieces. |
 19 The front side completed. Not pretty but better looking than the tarps. Considering it's all done with lumber that was laying around, some of it for 10 years or more, I'm happy enough. |
 20 A gable end rough framed ... |
 21 and sheeted. |
 22 Here's a finished side, |
 23 with the 1x6 carried right to the top. |
 24 The garage edge caulked and hidden by a trim piece; done. |
 25 Last pic; the front view. |